Saturday, August 25, 2012
Back to School: Toddler Clock
I don't know if all kids are like this, but mine seem to have a strong need to know what the plan for the day is. "What day is it today?" they ask... and they don't mean Monday or Tuesday. For us it is Library Day, or Uncle Mark Day (Saturday, when their uncle often visits to help daddy work on his hot rod.) They like to know what it going on during the day too. So with the changes in our schedule that come with a new school year, I came up with this idea that can help them see at a glance our basic schedule for the day... time for toddlers:
Starting about 8 o'clock they can see the sun that represents our morning routine. At quarter to 9 my oldest heads off to school. 10-ish is morning snack (I have a whole hour window and can still be "on schedule" which is so important when I'm squeezing in the daily busyness), 11 is time dedicated to helping my 2nd with her goals. Next is lunch, then preschool/kindergarten, time for preschooler on her off-days, big sister comes home, chores and homework, playtime, dinner, bedtime routine. Each of them have a time when my focus is primarily on them and their goals. I think it helps them see that their time is coming if mom is focused on someone else. I used Velcro dots to attach the pictures so we can change our schedule as needed. They don't need to know how to tell time, but can see by where the hour hand is pointing what "time" it is.
When I had the idea, I was going to make my own clock but found this one (or search for Kaisercraft Wood Frame Clock) while shopping for the clock parts. I covered it with scrapbook paper, added my own numbers.
It does have a pretty loud ticking sound, so I may try to replace the hands with another set, but it was an easy project that helps our day run more smoothly.
Wednesday, June 13, 2012
A new life for my favorite jeans

I've been going through my closet lately and weeding out and recycling/refashioning things like crazy. (Yay for losing baby weight and fitting into things again.) I had this pair of jeans that I loved! I've never had a pair that fit me as well as these did and it shows. These jeans were so worn, there was actually a hole on the inner leg area. I mended it once when it was small enough for it to not really show while I was wearing them, but that didn't last long because they were so threadbare. I knew I couldn't ever wear them again, and neither could anyone else, unless....
... I made them into a skirt.
I've made jeans into skirts before but this time I tried something
different and I love the result. Normally I unpick the inseam and the
center front seam up to the base of the zipper, and the back seam up
until it lays flat. Then, I overlap the curved part of the seam and use
the cut off portion of the jeans to fill in the triangular gaps.
(Similar to this tutorial.)
This time I just sewed the inner front seams together and only added
more material in the back (see photo above). The combination of the side seams angled in
on the front and the fading has a real slimming effect. Love it even
more than I thought I would.
![]() |
| (FYI - the hem is not really higher in the front, the front waist sits lower than the back so it just looks that way here.) |
Monday, May 14, 2012
I love this!
![]() |
| My entry to win a free Canon 5D Mk III via @CameraBag 2 (http://bit.ly/cb2-5d) #cb2giveaway |
Okay mostly I love this little face, but this cool photo editing software that I'm trying right now is pretty great too.
This CameraBag2 application is so cool... I love my Photoshop, but for quick editing with just a few clicks this is the greatest, and has soooo many cool options.
Here is my original photo below. It took me four clicks to arrive at the result above: contrast, "wedding," vignette, border. Sweet!
Tuesday, April 17, 2012
Easter Dresses
I had wanted to make some "pillowcase" dresses for the girls for a while now, and had found this pack of curtains on clearance over a year ago that I thought would work. But, I was sick last spring with the pregnancy so it never happened. Now, the day before Easter, I suddenly decided I was going to use the stuff I had to make Easter dresses. N's dress is one side of the curtain, A's the other, and E's skirt is from the valance. I had to laugh at my "Fraulein Maria" moment, making dresses from curtains. I think this is a new record for me, making three dresses in one afternoon, as well as the cost: $3 for the curtains, $3 for a yard of the striped fabric, elastic recycled from dad's shorts ;-0 and slips/lining from an old sheet. (My girls, who loved the dresses, will probably die of embarrassment reading this later. Hee hee.) So here they are. The dresses were okay, but the girls were so adorable! Check out the poses.


Saturday, March 31, 2012
Sock Bunnies
I've been wanting to do this little project with the girls for a while now and am feeling good about finally getting around to it today. Crafting with 4 little kids can be a challenge. (As is evident in the lack of posts on this blog.) My 5 year-old especially got into it, insisting on doing all the stuffing without any help, and she stitched the openings of each arm leg and foot closed all by herself too. I think this was her first real sewing project and I was so impressed with how well she did.
As soon as they were finished the girls got busy dressing them with clothes and accessories from their other dolls.
I think they turned out pretty cute, and the fact that they helped make the bunnies themselves adds to the love.


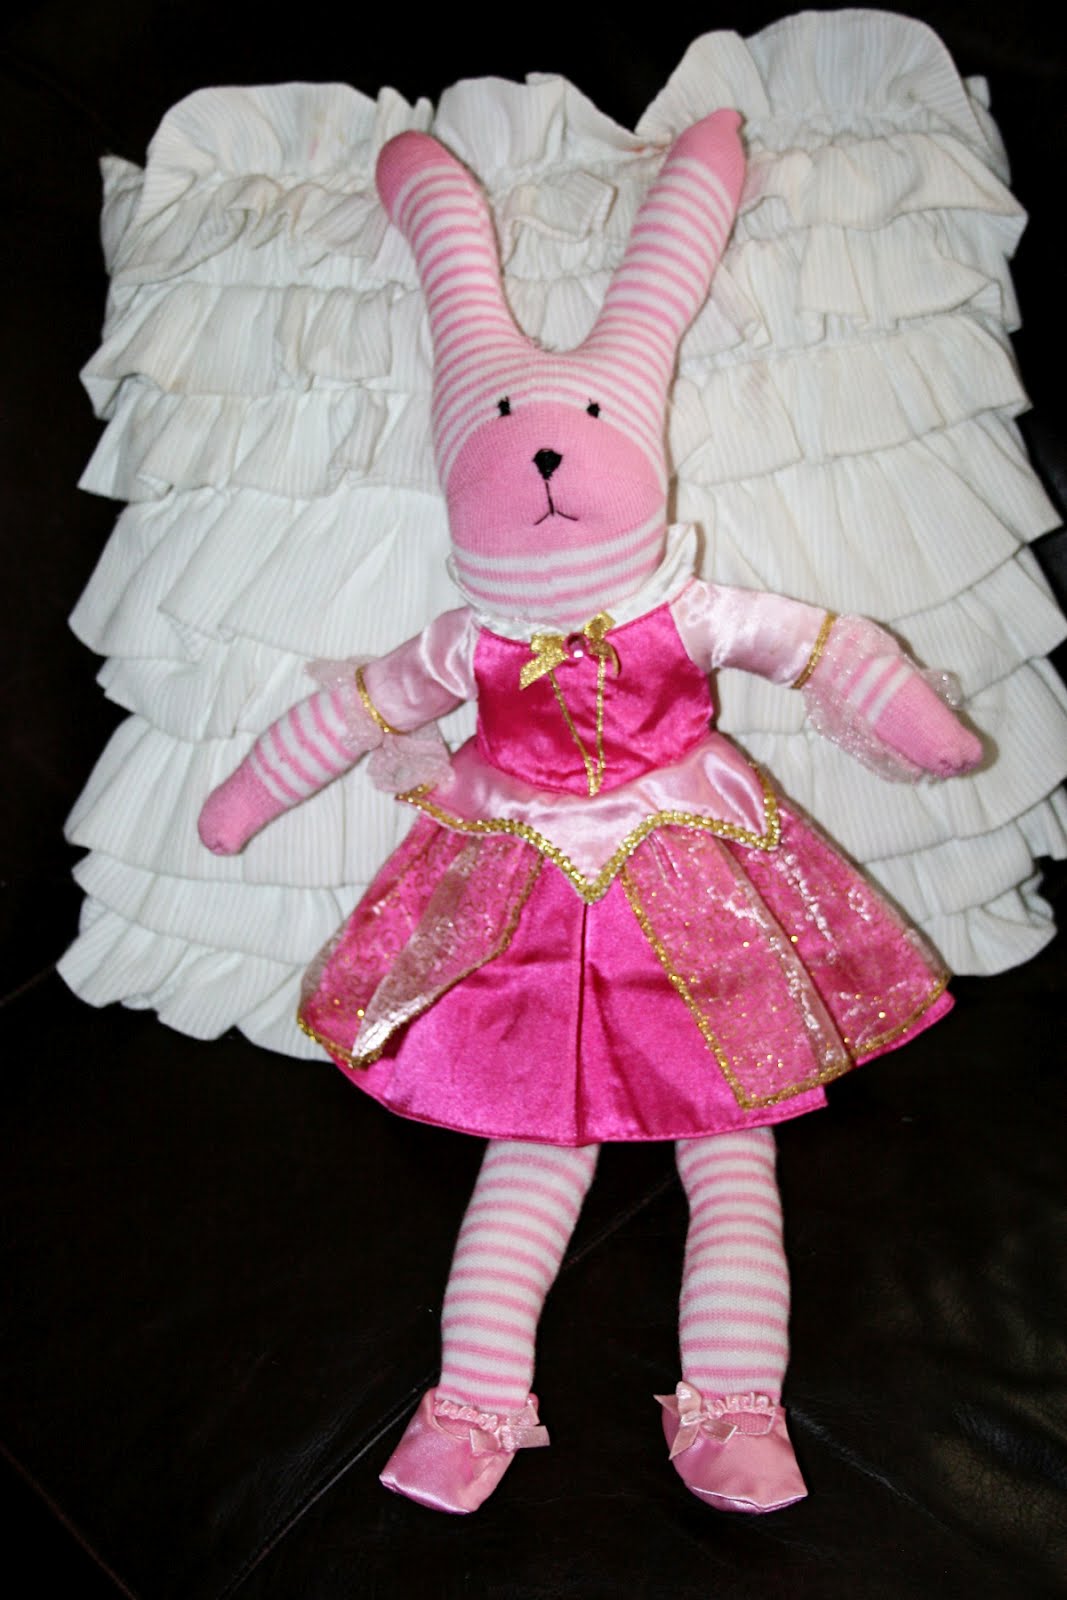
The bunnies just happen to be the perfect size to fit into our Disney princess baby doll clothes. When I saw the pink bunny in the Sleeping Beauty dress, complete with little slippers I had to take another photo.
We followed this tutorial from Lil Blue Boo, but decided to embroider the eyes instead of using buttons. (I loved the unique look of mis-matched buttons for the eyes but the girls thought it was creepy and they insisted on eyelashes too.)
Wednesday, November 16, 2011
Happy Thanksgiving
Saturday, October 29, 2011
Happy Halloween
While the blogging has almost completely ceased since the arrival of baby boy... the crafting has only slowed a little. Will I ever catch up? Probably not, but here is a little something fun we did for the "candy holiday" – a simple Halloween wreath. We took a dollar store wreath form and tied lengths of black tulle around it. My 6 yr old and 4 year old were great helpers with this part. If I were to do it again, I might cut the tulle longer and have a fuller look. I added in some purple and orange ribbon and then hot glued this spider web (also from the dollar store) to the back, making sure I didn't cover the peep hole.
The peep hole is important because of the number of door-to-door salesmen who don't seem to understand what "no soliciting" means. I put that sign up after being visited by 6 sales people in three days... a little much for pregnant mom/new baby mom. My dad also rigged my doorbell so I can switch it off when baby sleeps. Why isn't this a standard doorbell feature? OK, rant over.Salesmen stay away! Trick-or-treaters welcome!
Wednesday, August 24, 2011
Ruffle Dress Refashion
I've seen a lot of cute things in blogland made from this ruffle fabric and have been wanting to try it. Until recently it wasn't available in my local fabric shops and at $17 + a yard I didn't jump on it right away. One day I saw this XLarge top at a thrift store and grabbed it for a few dollars. I thought it would be an inexpensive way to see how I liked sewing with the ruffled material.
I used the Sienna Dress pattern that I had from Lil' Blue Boo to make a cute little dress for my toddler:

Since the shirt already had some interesting details with the crisscrossing ruffles at the top of the shirt, I was able to keep that same look by my pattern placement. I reused the shimmery neckline to finish my smaller neckline adding a flower made of the ruffles to cover the spot where my new seam ended up. I think I might add a few more flowers there so it doesn't look so lonely.
Cutting the ruffled fabric and sewing it, I had to be careful to keep the ruffles laying the same direction, so it took a little more pinning than I might otherwise have needed. Matching the ruffles at the shoulder seams to the front was a little tricky too. Overall, however, it is a quick way to get a much more complicated looking dress from a really simple style. I've already got plans for a few more ruffle fabric dresses for my older girls.
I couldn't get baby girl to pose wearing her new dress and wasn't up for a power struggle over a blog post, but she does like it and looks so cute in it!
Tuesday, August 2, 2011
Learning our Colors
So far our summer has been filled with as many indoor activities as I can dream up during the day, saving the outside time for the evenings when the temperature is more bearable for a cranky pregnant lady. This is one we did last week. I saw the idea on Pinterest, pinned from the blog Gluesticks... and thought it would be a good craft for the girls to help with as well as a fun way to have the older girls help baby girl learn her colors. I got the unfinished wood pegs and candle holder cups at Hobby Lobby. Even though they were pretty inexpensive to begin with, all their unfinished wood was 30% off last week... even better. The girls helped me paint all the solid colors and I finished the hair and faces after they were asleep. They've already had a lot of use. Now I just need to whip up a little drawstring bag to keep them together.Saturday, June 18, 2011
Maternity Solutions 5: One more dress
Just one more example of using two items to make one that fits the need. I found this shirt/tunic on clearance for $7 and, of course, bought two. Again, I used the bottom half of one to elongate the other. The busy, floral print hides the seam pretty perfectly.
The leftover top half is intended for a dress for my daughter with the pintucking detail that I am looking forward to incorporating into a bodice.Monday, June 13, 2011
Maternity Solutions 4: Pants
During my first pregnancy I wore my regular pants for a long time using the rubber band trick. Now I find myself longing for the comfort of the full belly panel even before I'm truly showing. There are lots of cute maternity jeans/pants out there... even designer versions, but I also noticed a few DIY tutorials and thought I'd give it a try.I had these white skinny jeans that had been really inexpensive but I hardly ever wore because I didn't really like the back pockets. They have a bit of stretch to them, so I thought they'd work well for this alteration. My favorite tutorial is on Grosgrain, here. She gives really great step-by-step instructions with pictures.
The one thing I did differently is that instead of making my own panel, I used a "Belly Band" that I already owned. I like the thinness, the stretch and smoothing support of this over a knit folded in half... and the panel doesn't slip down like a knit might. It also makes this alteration even easier. My favorite belly panels are from Forever21.com. Sadly they don't have them on the site as I'm posting this. They were only $7.80 each and are the most supportive, longest (covers the entire belly, not just up to the belly button leaving a line at your widest point) and definitely the most affordable ones I've found.
I think the most important step is to try on the band and the pants together before sewing, as Kathleen mentions, and make some marks where you will pin the two pieces together. You will want more of the panel in front than in back, as opposed to just attaching the band evenly. I was prepared to trash these pants if it didn't work out and was happy that it went together smoothly.

I recently saw a love/hate conversation about skinny jeans on Facebook and I had to laugh because those opposed to skinny jeans in general would certainly be appalled by my pregnant channeling of Tweedle-Dee or Tweedle-Dum here. I say to each his own. Whatever style you like, give your pregnant self the gift of being able to breathe and move without constantly hitching up your pants!Maternity Solutions 3: Using my leftovers
Remember the top half of that blue dress from the last post? Here it is with short sleeves and a new, maxi length skirt. I'd seen the fabric on clearance for a few dollars a yard and just guessed that the color might be close. The material for the skirt is slightly darker and is not knit but a silky, lightweight, polyester blend of some sort. I just sewed the whole piece matching both selvedge ends into a tube and then held it over my tummy draping it different ways and pinning. I decided to do a double box pleat in the front and just slight gathering around the sides and back to avoid too much poof, but still being able to stretch with the knit as I put it on. Then I hemmed it and made yet another sash to help define the "waist" area. Maxi dresses are really popular right now and I have been wanting to find a maxi that actually was floor length on me. To be honest, this is not the most practical dress with my toddler who likes to grab hold and hang on the skirt, so I don't know how often I will wear it but I do like the feel of the silky long skirt brushing against my legs as I walk.
This tunic is from a pre-maternity alteration that I did. I used the skirt from one and added a yoke to top to make a long slip to wear under the tunic so that it looks like a dress. I can also wear the tunic over pants and leggings. I had this leftover top part sitting around along with a bunch of the grey fabric I'd bought on clearance and used for the yoke. I decided to try another maxi dress. This time I gathered the skirt mostly across the front and left the sides and back to hang straight. Without the sash it hangs straight down. As I look at this in the pictures I've decided the top needs a little more work to fit a little better and be more flattering as well, but in a very short time, using leftover stuff in my stash I have another option.
Friday, June 10, 2011
Maternity Solutions 2: My favorite refashioning tip
When shopping for clothes I like to comb the clearance racks. Similar to thrift shopping I don't worry about seasons or sizes but look for fabrics, patterns or details that I like. My tip? When you find something you like, buy TWO!
It may sound expensive but trust me, I often get better deals than if I had purchased at a thrift store. For example, I recently shopped the final clearance at JCPenney with an additional $10 off a $25 purchase coupon. I got seven things for $25 - $10=$15. That's a little more than $2 per item... and it's new, and usually more on trend than secondhand. Several items will be altered and a few were sweaters that were out of season for the store, but will be perfect for me this fall.
When you buy new, you can also often find more than one item and there is typically more stock of the extra large sizes, which is perfect for altering/refashioning clothing because it means you have more fabric to work with. It also solves the problem I mentioned in my last post of finding fabric to match the item you are trying to alter and almost always less expensive than buying additional fabric and notions.
For example, I found the following dresses on clearance at Forever21.com in their maternity section. (Tip: if you click on their maternity section and do a search for "maternity" at the top of their site you will get different results so be sure to try both.) Each dress was on clearance for less than $10 so I bought two of each. Compared to the dresses I was eyeing in maternity stores this was a great price.
For many, this first dress would work well as is, but for me it needed to be longer. This is probably the most basic and frequent alteration I have to make.
So from one of the dresses, I cut two equal width strips of fabric, pieced them together and gathered the top to make a ruffle. Then I sewed it onto the bottom of the other dress. Because the fabric matches perfectly, it's less obvious that it was ever altered. Plus, I still have plans for the remainder of the dress... as you will see in my next post.
This next dress needed a little more work. The color was so beautiful and I loved the draping, sheer over-layer. In addition to being too short as usual, it was also cut too deep in the front and the back and a positively shapeless and unflattering top altogether.
I used the bottom of both layers of one dress to add some length to the other dress. Then I used the knit layer of the rest of the skirt to make a cap-sleeve camisole tee (technically a half-tee as it doesn't go over my belly). To do this I just traced around the front and back of one of my SHADE shirts and sewed the two pieces together . I cut the rest of the sheer layers into two long strips and pieced them together to make the sash. To finish the sash I got to use my new rolled hem presser foot.
I liked the effect of the sash both in adding to the draping of the skirt as well as giving some shape to the waist/bust area of the dress.
So, there's nothing groundbreaking about anything I did, and that is exactly the point. Altering an item for modesty or making clothes fit and work for your style shouldn't be intimidating because it's usually very simple and can save you a lot of money and help you feel more comfortable in what you're wearing. Sometimes you just have to get over cutting into that dress and going for it... which I admit, is easier to do the less expensive the item was to begin with. Start with your sister's free cast-offs and work up your confidence to try other things.
It may sound expensive but trust me, I often get better deals than if I had purchased at a thrift store. For example, I recently shopped the final clearance at JCPenney with an additional $10 off a $25 purchase coupon. I got seven things for $25 - $10=$15. That's a little more than $2 per item... and it's new, and usually more on trend than secondhand. Several items will be altered and a few were sweaters that were out of season for the store, but will be perfect for me this fall.
When you buy new, you can also often find more than one item and there is typically more stock of the extra large sizes, which is perfect for altering/refashioning clothing because it means you have more fabric to work with. It also solves the problem I mentioned in my last post of finding fabric to match the item you are trying to alter and almost always less expensive than buying additional fabric and notions.
For example, I found the following dresses on clearance at Forever21.com in their maternity section. (Tip: if you click on their maternity section and do a search for "maternity" at the top of their site you will get different results so be sure to try both.) Each dress was on clearance for less than $10 so I bought two of each. Compared to the dresses I was eyeing in maternity stores this was a great price.
For many, this first dress would work well as is, but for me it needed to be longer. This is probably the most basic and frequent alteration I have to make.
So from one of the dresses, I cut two equal width strips of fabric, pieced them together and gathered the top to make a ruffle. Then I sewed it onto the bottom of the other dress. Because the fabric matches perfectly, it's less obvious that it was ever altered. Plus, I still have plans for the remainder of the dress... as you will see in my next post.
This next dress needed a little more work. The color was so beautiful and I loved the draping, sheer over-layer. In addition to being too short as usual, it was also cut too deep in the front and the back and a positively shapeless and unflattering top altogether.I used the bottom of both layers of one dress to add some length to the other dress. Then I used the knit layer of the rest of the skirt to make a cap-sleeve camisole tee (technically a half-tee as it doesn't go over my belly). To do this I just traced around the front and back of one of my SHADE shirts and sewed the two pieces together . I cut the rest of the sheer layers into two long strips and pieced them together to make the sash. To finish the sash I got to use my new rolled hem presser foot.
I liked the effect of the sash both in adding to the draping of the skirt as well as giving some shape to the waist/bust area of the dress.
So, there's nothing groundbreaking about anything I did, and that is exactly the point. Altering an item for modesty or making clothes fit and work for your style shouldn't be intimidating because it's usually very simple and can save you a lot of money and help you feel more comfortable in what you're wearing. Sometimes you just have to get over cutting into that dress and going for it... which I admit, is easier to do the less expensive the item was to begin with. Start with your sister's free cast-offs and work up your confidence to try other things.Thursday, June 9, 2011
Maternity Solutions 1: Altering non-maternity dresses
When coming up for a title for this series I also considered "Maternity for Less" or "Maternity Refashions" or "Maternity for the Tall Girl".... I couldn't decide. I just wanted to share some of the ways I dress the baby bump, while staying comfortable and keeping it affordable. I will spread out my posts over the course of about a week and I invite you to please share your tips and tricks as well.
Tip #1: Shop non-maternity
Look at much larger sizes than you'd normally wear. Look for things with an empire waist. In this post I focused on dresses, because it's summer and I find them less constricting and more comfortable in the heat, but I do the same thing for tops.
I found this cream colored dress at Forever 21. The elastic waist made it a possible to add more room in the front, and the tiered bottom made it ideal for adding the length I often need because I am fairly tall. (I'm accustomed to doing this, preggie or not, but when your belly sticks out making things flare out, dresses seem even shorter.) Often I need to take a larger size in around the bust and shoulders, but didn't need to with this dress.
First, I secured the elastic at the sides by stitching over it a few times. Then, from the inside, I cut a small slit in the elastic casing and cut and removed just the elastic that was in the front. Now it is loose in the front, but still has shape in the back. I can always replace the elastic later when I don't need maternity anymore.
The hardest part was actually finding a matching fabric to add another tier to the bottom. I found something that was the right color and similar weight, but it was a crinkled texture. It was close enough and the difference is barely noticeable and even a nice detail.
When I can't find a fabric to match I often add something completely different, for a colorblock look, or a visible slip look, or for the dress below... a contrasting or patchwork look.
This dress from the clearance rack of Charlotte Russe was already a patchwork style, so I just grabbed a small piece of fabric from my stash that had a floral print in similar colors and added a panel at the bottom. It was an extra large size, so I did need to take this one in just a little under the armpit to the high waist area. Again, the empire waist cut and the adjustable ties make this one work with room to grow.
Disclaimer: I don't consider myself a fashion expert by any stretch of the imagination and am not trying to attempt that with this blog. I do love taking hand-me-downs and clearance rack finds and making them work for my own style. A special thanks to my uber-talented photographer sister who snapped this pics of me while our children ran wild around our ankles. Not only does she really know her craft but she helped get a few normal looking pictures out of me while the whole time I really felt like this:
Tip #1: Shop non-maternity
Look at much larger sizes than you'd normally wear. Look for things with an empire waist. In this post I focused on dresses, because it's summer and I find them less constricting and more comfortable in the heat, but I do the same thing for tops.
I found this cream colored dress at Forever 21. The elastic waist made it a possible to add more room in the front, and the tiered bottom made it ideal for adding the length I often need because I am fairly tall. (I'm accustomed to doing this, preggie or not, but when your belly sticks out making things flare out, dresses seem even shorter.) Often I need to take a larger size in around the bust and shoulders, but didn't need to with this dress.First, I secured the elastic at the sides by stitching over it a few times. Then, from the inside, I cut a small slit in the elastic casing and cut and removed just the elastic that was in the front. Now it is loose in the front, but still has shape in the back. I can always replace the elastic later when I don't need maternity anymore.
The hardest part was actually finding a matching fabric to add another tier to the bottom. I found something that was the right color and similar weight, but it was a crinkled texture. It was close enough and the difference is barely noticeable and even a nice detail.When I can't find a fabric to match I often add something completely different, for a colorblock look, or a visible slip look, or for the dress below... a contrasting or patchwork look.
This dress from the clearance rack of Charlotte Russe was already a patchwork style, so I just grabbed a small piece of fabric from my stash that had a floral print in similar colors and added a panel at the bottom. It was an extra large size, so I did need to take this one in just a little under the armpit to the high waist area. Again, the empire waist cut and the adjustable ties make this one work with room to grow.
Disclaimer: I don't consider myself a fashion expert by any stretch of the imagination and am not trying to attempt that with this blog. I do love taking hand-me-downs and clearance rack finds and making them work for my own style. A special thanks to my uber-talented photographer sister who snapped this pics of me while our children ran wild around our ankles. Not only does she really know her craft but she helped get a few normal looking pictures out of me while the whole time I really felt like this:
Sunday, May 29, 2011
Interested in Maternity?
Here is a link to see a lot more over on the blog of A Jennuine Life. While you're there you can vote for your favorite of a number of different handmade maternity outfits in the finals of her contest... including my white tunic from the last post. I have to admit, I'm loving the red dress.
Friday, May 13, 2011
I'm back, with a pattern review
So, I haven't posted for a few months but I have been busy "cooking" up another one of the creations I'm most proud of... yep, we're expecting a new addition. This pregnancy has been rough so far, and I've been in survival mode until just recently. I'm so glad to be back amongst the living with such a good excuse to sew for myself. The challenge of clothing the bump, especially during the hot months of summer is currently filling my creative time. Off-the-rack maternity often doesn't work for my tall frame, so I'm left with altering things at the very least. I also love being able to find/make things for as little cost as possible. I've come up with a few solutions that I thought I'd share, starting with a pattern review.The tunic pictured in this post (crooked photo above courtesy of my 4 year old) was made from Butterick 4856 with some alterations. I used version D (blue in the pic below) because of the gathers at the bottom of the yoke that I thought would drape over my baby belly nicely. I cut one size larger than I would normally wear, and ended up taking in the shoulders a bit so it still fit where I'm not growing. I also cut off the sleeves a little shorter than the pattern and finished it with a lace trim instead of adding the cuff. It was a very easy pattern, especially since I skipped the cuff, and came together quickly. I thought it was loose in the back so I added a small strip of elastic (sorry no picture) right in the center (about the same height as the gathers beneath the bust) to give it some shape while allowing it to stretch as I grow.

Here's a little closer view (so hard to take pictures of myself). I used a stable knit fabric that I picked up in a grab bag of fabric at the thrift store. The whole bag was $3.oo and I have several yards of grey knit and a beautiful brown and black chiffon print still to use. The lace trim on the sleeves came off another skirt that I'd refashioned, so the only thing I bought was the trim around the bottom (detail of trims below) that I got for a few dollars with a coupon.
Subscribe to:
Posts (Atom)